Developing SPFx solutions using WSL

This is the second of 4 articles on using containers for SharePoint Framework (SPFx) development.
Disclaimer
While I have learned a lot about containers over the last 2 years, I do not claim to be the final authority on this topic. My goal over these next 4 articles is share what I have learned and how I use that knowledge in my daily life as a SPFx developer. Containers are not just for SPFx but work on many developer technologies. In fact, I used containers, primarily Codespaces, to write this blog, which uses Hugo/Go. I encourage you to do the research and make your life easier.
The following links will be updated as articles become available.
- Part 1: Introduction
- Part 2: Windows Subsystem for Linux (WSL) (this article)
- Part 3: Docker
- Part 4: Github Codespaces - upcoming
Remote Containers
Remote containers is a generic term for any environment that is not on your local device. More accurately, the environment is not running against your local file system. The best way I have found to use this technology is through VS Code extensions. I use three of these container solutions.
- Windows Subsystem for Linux (WSL), accessed through the Remote-WSL extension
- Docker, accessed through the Remote-Containers extension, and
- Codespaces, accessed through the Github Codespaces extension.
This is the article on WSL and the Remote-WSL extension.
Windows Subsystem for Linux (WSL)
Background: I won’t get into reasons, pro or con, for any OS here, but I have always been a Windows user. Using the Windows OS for SPFx development works fine and there is a specific version of NVM (NVM for Windows) built for Windows, so all of the options listed in the first article of this series are available. It is not identical to the original NVM, but works just as well with some minor changes in the commands.
Despite the ability to create multiple environments, the primary issue I have with Windows is that is is very slow when running the commands needed to develop SPFx solutions. I have watched videos and live demos where presenters showed blazing speed when running the same commands that take “forever” on my Windows device. The thing that most of them had in common was that they were using MacOS, so I was determined to find a faster way to accomplish SPFx development, hopefully without spending a bunch of money on a MacOS device. Also, my primary devices for building SPFx solutions are usually provided by my employer and I don’t have any non-windows options.
A few years ago, Windows 10 offered a new technology, called Windows Subsystem for Linux (WSL) which showed promise for running faster than Windows without having to replace the core OS of the device. Over time, getting this set up on your device has become almost as simple as installing an app. Follow the instructions here to get started with WSL, Set up a WSL development environment
Wait! What does this have to do with containers?
The answer is that WSL is actually running in a container on your local machine. This container uses the Linux OS and provides the ability to access the WSL file system from Windows apps, as well as accessing the Windows file system from inside the WSL container!
The best way to access WSL is through the command prompt, including my favorite, Windows terminal, which is covered in the Setup article above. Refer to the Node Version Manager site to get the latest version of the following command. From a BASH prompt inside WSL, use the following command to install NVM.
curl -o- https://raw.githubusercontent.com/nvm-sh/nvm/v0.39.1/install.sh | bash
From here, you can use NVM to create multiple environments, just as I talked about in the Introduction article of this series. Based on my original reason for using WSL, it was time to see if WSL is faster than Windows. It took some trial and error before I found the secret.
Here is the secret to making WSL faster than Windows.
You have to store the project files in the Linux (WSL) file system (not Windows!) The primary speed issues experienced in Windows are caused by the file system. If you store your files in the the Windows file system and run commands (like
npm i) against them from Linux, you will get the exact same slow experience you had running the commands from a Windows-based prompt. Create a workspace folder in Linux for your code, then create and run your SPFx development commands from a prompt in your project folder.
The best way to set up your SPFx developer environment is from the terminal prompt used above to install NVM. First, install a NodeJS version (using NVM) and then install the global tools you need for SPFx. For example, execute the following commands to start building SPFx solutions in the lastest SPFx version (1.14.0 as of this writing):
// Install the version of NodeJs needed for SPFx v1.14.0
nvm i 14

// Install the tools needed to create SPfx solutions
npm install -global gulp-cli yo @microsoft/generator-sharepoint

// Create a folder for your solution and change to that folder
mkdir mysolution && cd $_

// Launch the Yeoman Generator for SPfx to create your project
yo @microsoft/sharepoint

// Once your project is created, you can open it in VS Code with
code .
Installing the Developer certificate
As with any other new developer environment, you will need to install the developer certificate into your Windows Certificate Manager. This is where things are a little different from working in Windows. Before you panic, this only has to be done once for WSL. When you execute the gulp trust-dev-cert in the Windows (or MacOS) file system, the certificate is automatically installed for you into the Certificate Manager. This does not work in WSL because the trust command runs in Linux and the browser where you debug your solution runs in Windows. In this case, Windows is the host system. Linux has no ability to reach back into the host system and run the commands needed to install the certificate.
So there are a few extra steps needed when you are running the SPFx debug app (https://localhost:4321) in a remote container. FYI, these steps are the same you will take in Docker and Codespaces to get the certificates loaded correctly.
NOTE: If you do not properly install the certificate, the workbench will always display the message reminding you to run gulp serve to load your solution. The reason is that the workbench is asking for your solution’s manifest file at localhost:4321, but if there is is no valid certificate, the browser blocks delivery of the file. To see this, in the browser developer tools, search for “manifest” in the Network traffic tab and you will see the error.
To create the certificate, execute the following command:
// Create the certificate
gulp trust-dev-cert
The certificate is created at ~/.rushstack/rushstack-serve.pem. We will convert the certificate to the correct filetype for Windows and place the certificate in the root folder of our project with the following command:
// Transform and copy certificate to project
openssl x509 -inform PEM -in ~/.rushstack/rushstack-serve.pem -outform DER -out ./spfx-dev-cert.cer
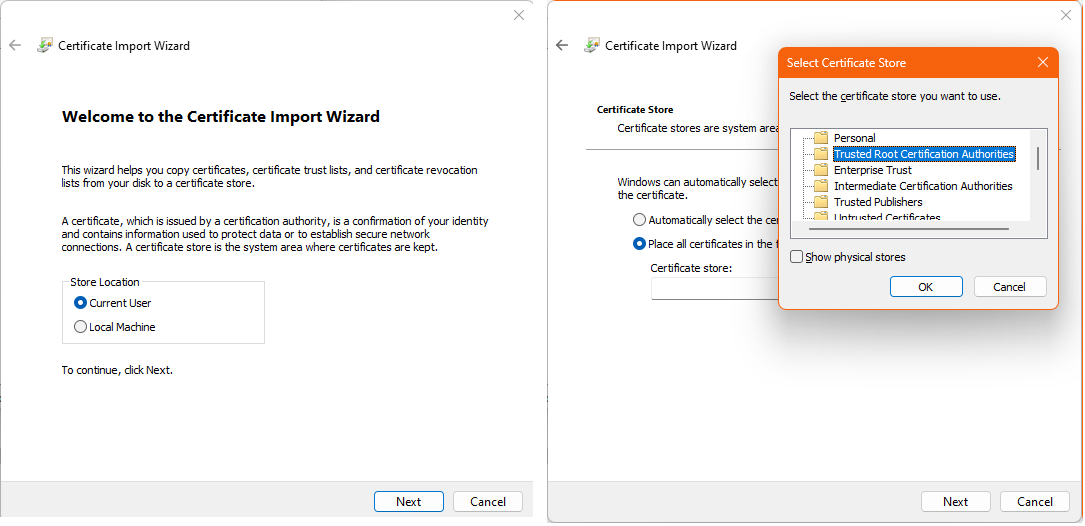
From here, you can see the certificate in the root of the project in VS Code. Right click and choose download. Save the certificate in the Windows file system. I use the Downloads folder. Then you can open Windows explorer, navigate to the location of the certificate, right click and choose to Import Certificate to the Current User store. Follow the prompts, but choose to store the certificate in the Trusted Root Certificate Authorities store, as shown below.
When you run gulp serve now, you should not get the manifest error and you can proceed as normal.
Port forwarding
When you run your solution in WSL, your browser needs to be able to communicate with your app on port 4321. Fortunately, WSL forwards that port to the host automatically, so you do not need to set that up.
Dev Containers
In the next two articles of this series, we will cover Docker and Codespaces containers. Both of these technologies can be automated using a special set of files, normally located in a folder named .devcontainer. As part of those files, we will look at a script to automate some of the steps in this article. That script is a set of Bash commands that can also be run from WSL. Since I set up most of my projects to be worked on from any of the remote environments, I always include those files in my project, which makes it easy to manually run the script in WSL also.
What’s next?
Next, we will look at how we can create a development environment without installing anything on our local device except Docker. We will use Docker to build containers that are fully configured and ready to use as soon as you start them.
As mentioned in the Disclaimer at the beginning of this article, I am not the final authority on this subject. If you find errors, PLEASE contact me at any of my Contact Me links. I want to make sure the information I am delivering is correct (and better understand it myself.)
References
- SharePoint Framework Quick Start: Covers the basics to get a development environment set up on a new machine.
- Set up a WSL development environment
- Better Node.js Install Management with Node Version Manager: Detailed article on NVM by Andrew Connell
- Node Version Manager(nvm)
- NVM for Windows