Developing SPFx solutions using Docker

This is the third of 4 articles on using containers for SharePoint Framework (SPFx) development.
Disclaimer
While I have learned a lot about containers over the last 2 years, I do not claim to be the final authority on this topic. My goal over these next 4 articles is share what I have learned and how I use that knowledge in my daily life as a SPFx developer. Containers are not just for SPFx but work on many developer technologies. In fact, I used containers, primarily Codespaces, to write this blog, which uses Hugo/Go. I encourage you to do the research and make your life easier.
The following links will be updated as articles become available.
- Part 1: Introduction
- Part 2: Windows Subsystem for Linux (WSL)
- Part 3: Docker - this article
- Part 4: Github Codespaces - upcoming
Remote Containers
Remote containers is a generic term for any environment that is not on your local device. More accurately, the environment is not running against your local file system. The best way I have found to use this technology is through VS Code extensions. I use three of these container solutions.
- Windows Subsystem for Linux (WSL), accessed through the Remote-WSL extension
- Docker, accessed through the Remote-Containers extension, and
- Codespaces, accessed through the Github Codespaces extension.
This is the article on Docker and the Remote-Containers extension.
Why do I need to do this?
Honestly, if you are just creating SPFx solution in the latest version, there is not much to gain from this approach. Using Node Version Manager (NVM) will allow you to set up your environment with all of the tools needed and even swap back to a different version if needed. The main benefit to containers is letting you run environments with no tools installed on your local machine, but I always have the local tools installed, specifically in WSL. (see previous article on WSL here)
So the main reason I set this up is because the using of containers with Docker is almost exactly the same as using containers in Github Codespaces, which is the next article in this series! Once I have a project configured correctly for Docker, I can push all of my code to Github, then open that repo in Codespaces where I do not need anything installed on the local machine to edit my solution, including debugging it as needed.
The other reason to learn this is because the PnP Samples repos (see aka.ms/m365pnp) have recently been updated to include the “Dev Container” files. This allows you to download a sample, open it in VS Code using the container files. You do not even need to know what version of SPFx the solution uses, because the container files will configure everything for you!
NOTE: Currently, Codespaces will only build a container based on the “Dev Container” files located at the root of the repo. Since the PnP Sample repos consists of many projects, and those projects are using different versions of SPFx, so there is no way to just have them all work in one container. There is an enhancement request to allow a project in a folder to use the “Dev Container” files in the folder, but I don’t know when that will happen. In the meantime, Docker works! So let’s get started!
Step 1. Docker for Windows
The first step to using Docker Containers is to install Docker Desktop from https://www.docker.com/products/docker-desktop. Docker can be used to build containers for many environments and is often used by developers to create containers that contain their application, along with all of the software needed to support the application. These containers can be deployed into any container-hosting service to allow rapid deployment and maintaining of production applications.
Docker has several subscription levels, but the Personal subscription is free and includes everything we need to use in SPFx development. Setup is simple and accepting the defaults during installation set everything up for us.
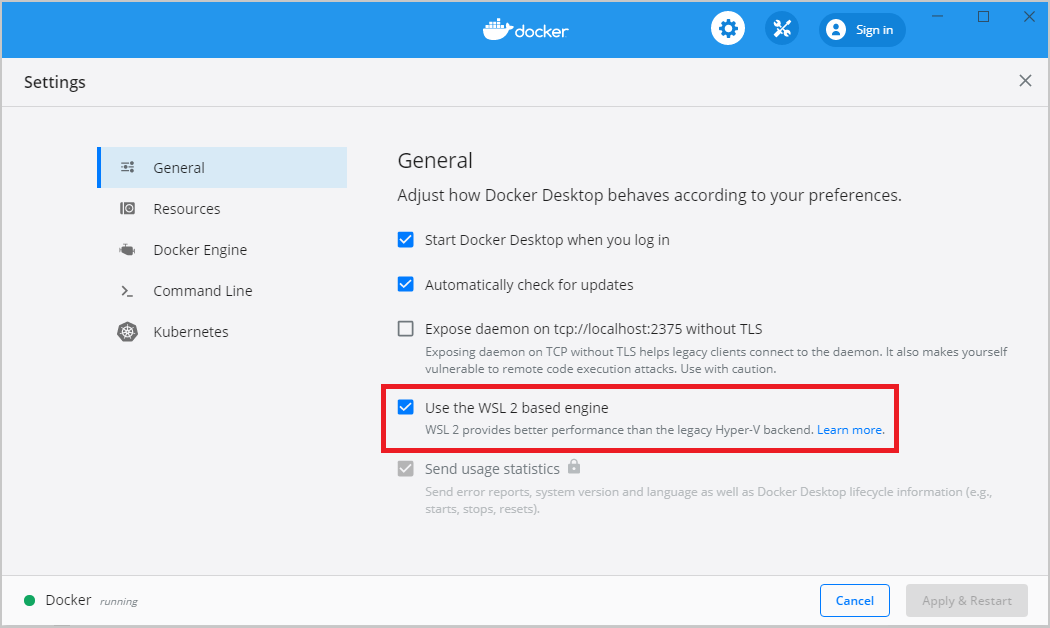
If you have set up Windows Subsystem for Linux (WSL) on your Windows machine, there is an additional setting that will optimize Docker Desktop for peak performance. Details can be found at here. To enable the WSL based engine, start Docker Desktop, navigate to Settings > General, check the “Use the WSL 2 based engine”, then click Apply & Restart.
Step 2. Remote-Containers extension for VS Code
The next step to set up your container environment is to install the Remote Containers extension for VS Code. To do this, open VS Code and the extensions icon (or use the keyboard shortcut Ctrl+Shift+X), and search for “Remote Containers. Select the “Remote - Containers” extension and install.

My experience is that I do not interact very much with this extension. The primary enhancement this offers is that when you open a project in VS Code that has the "Dev Container" files included, you will be prompted to reopen the project in the container.
Step 3. Create a new project
Now we are ready to create a project. Create a new folder and navigate there. There is no need to run “npm install” on the project since we will set that up to happen in the container, so use the –skip-install setting.
yo @microsoft/sharepoint --skip-install
Step 4. Add the Dev Container files to the project
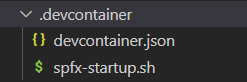
Here is where the magic happens. We are going to create a new folder, named .devcontainer in the project. Notice the period at the front of the folder name. This is a special folder that the Remote-Containers extension uses to recognize a project that has been configured for containers. In the folder, we will create 2 files, devcontainer.json and spfx-startup.sh. The files listed below are the same that are used in the PnP samples repositories to enable containers, so that is a great place to start. The resulting .devcontainer structure looks like this
The first file, devcontainer.json, has the following contents:
// For more information on how to run this SPFx project in a VS Code Remote Container, please visit https://aka.ms/spfx-devcontainer
{
"name": "SPFx 1.14.0",
"image": "docker.io/m365pnp/spfx:1.14.0",
// Set _default_ container specific settings.json values on container create.
"settings": {},
// Add the IDs of extensions you want installed when the container is created.
"extensions": [
	"editorconfig.editorconfig",
	"dbaeumer.vscode-eslint"
],
"mounts": [
	"source=/mnt/c/,target=/workspaces/c,type=bind,consistency=cached",
],
// Use 'forwardPorts' to make a list of ports inside the container available locally.
"forwardPorts": [
	4321,
	// Not needed for SPFx>= 1.12.1
	//5432,
	35729
],
"portsAttributes": {
	"4321": {
		"protocol": "https",
		"label": "Manifest",
		"onAutoForward": "silent",
		"requireLocalPort": true
	},
// Not needed for SPFx>= 1.12.1
// 	"5432": {
// 		"protocol": "https",
// 		"label": "Workbench",
// 		"onAutoForward": "silent"
// 	},
	"35729": {
		"protocol": "https",
		"label": "LiveReload",
		"onAutoForward": "silent",
		"requireLocalPort": true
	}
},
"postCreateCommand": "bash .devcontainer/spfx-startup.sh",
"remoteUser": "node"
}
Here is an explanation of each sections:
- name: this just names the container. You could change this to be the name of your project for additional clarity. If not included, Docker will generate a random name.
- image: Containers start with a base image that is pre-configured with an operating system, and any other software the author of the image included. For SPFx, there is a library of these images maintained by the PnP Community that are set up specifically for working with SPFx. The images listed above is for SPFx v1.14.0, but if your project is built with a different version of SPFx, just change the version after the “:” to the desired version.
- settings: This can be used to add specific VS Code settings for the project. Normally, this is an empty array unless you want to change something in VS code.
- extensions: This is a list of extensions to be installed in VS Code when the container is created.
- mounts: This section connect the container to your local project files. Changes made to the project files are stored in your local file system, but you can run software in the container against those local files!
- forwardports: In order to test and debug your project, ports in the container need to be forwarded to your local system. Your browser uses these ports to connect to the server that runs when you execute the
gulp servecommand. Port 4321 connects to the server root, where the workbench looks for the manifest file for your project. Port 35729 is where the Live Reload modules watches for changes to your code. Port 5432 is used for the local workbench, but is not supported after SPFx 1.12.1. - portattributes: This section adds context to the forwarded ports above. THis section is optional in most cases as Docker does a great job of finding the ports needed automatically, but it helps identify those port when you are exploring the container.
- postCreateCommand: After the container is created and configured, the command in this section is executed. In our case, we are going to call for bash to execute the spfx-startup.sh script file, which allows us to execute multiple commands easily.
- remoteUser: This is the user account that the container operates under.
The second file, spfx-startup.sh, has teh following content:
echo
echo -e "\e[1;94mInstalling Node dependencies\e[0m"
npm install

## commands to create dev certificate and copy it to the root folder of the project

echo
echo -e "\e[1;94mGenerating dev certificate\e[0m"
gulp trust-dev-cert

# Convert the generated PEM certificate to a CER certificate

openssl x509 -inform PEM -in ~/.rushstack/rushstack-serve.pem -outform DER -out ./spfx-dev-cert.cer

# Copy the PEM ecrtificate for non-Windows hosts

cp ~/.rushstack/rushstack-serve.pem ./spfx-dev-cert.pem

## add \*.cer to .gitignore to prevent certificates from being saved in repo

if ! grep -Fxq '_.cer' ./.gitignore
then
echo "# .CER Certificates" >> .gitignore
echo "_.cer" >> .gitignore
fi

## add \*.pem to .gitignore to prevent certificates from being saved in repo

if ! grep -Fxq '_.pem' ./.gitignore
then
echo "# .PEM Certificates" >> .gitignore
echo "_.pem" >> .gitignore
fi

echo
echo -e "\e[1;92mReady!\e[0m"

echo -e "\n\e[1;94m****\*\*****\nOptional: if you plan on using gulp serve, don't forget to add the container certificate to your local machine. Please visit https://aka.ms/spfx-devcontainer for more information\n****\*\*****"
This file executes the following functions to prepare the project to be run from the container:
- The first step is to run
npm installto install all of the dependencies for the project - The next three sections generate the developer certificate needed to trust the container server from the local browser and make them easily available.
- First,
gulp trust-dev-certis used to create the certificate - The
opensslcommand then converts the certificate into a format used by Windows and saves the resulting certificate file in the root of the project. This certificate file is named spfx-dev-cert.cer. - Lastly, the
cpcommand copies the original certificate to the root of the project, naming it spfx-dev-cert.pem. This certificate is used by operating systems that don’t recognize the .cer format.
- First,
- The next two sections check to see if the .gitignore file contains the code to exclude the certificates we just created. If not present, the sections are added to prevent teh certificates from being stored in the git repository. (Storing certificates is considered a security risk, so we definitely want to exclude them.)
- Lastly, there is reference added to the PnP website that explains how to install the generated certificate in your local certificate store. I’ll cover how I do it below, but this website is always updated with the latest changes.
We are now ready to use our new Dev Container!
Step 5. Restart the project in the container
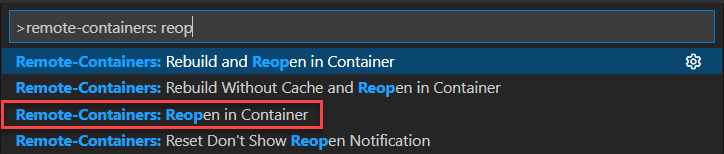
Make sure all of your files are saved, then click the green button  in the lower left corner and select “Reopen in Container.”

Alternatively, use "[CTRL] [SHIFT] P" and search for Remote-Containers: Reopen in Container.
Docker will now restart VS Code. You can follow along with the process of starting and configuring the container by clicking the “Show Logs” link that will pop up in lower right area of VS Code. After the container is started, the script file will run in the terminal window, installing the project dependencies and creating the dev certificate.
After the script finishes, you are ready to continue.
Installing the Dev Certificate
Next, we need to install the dev certificate in the certificate manager of the local device. In my previous article on WSL, I explained why this procedure differs from our normal installation procedure, so feel free to check that out here.
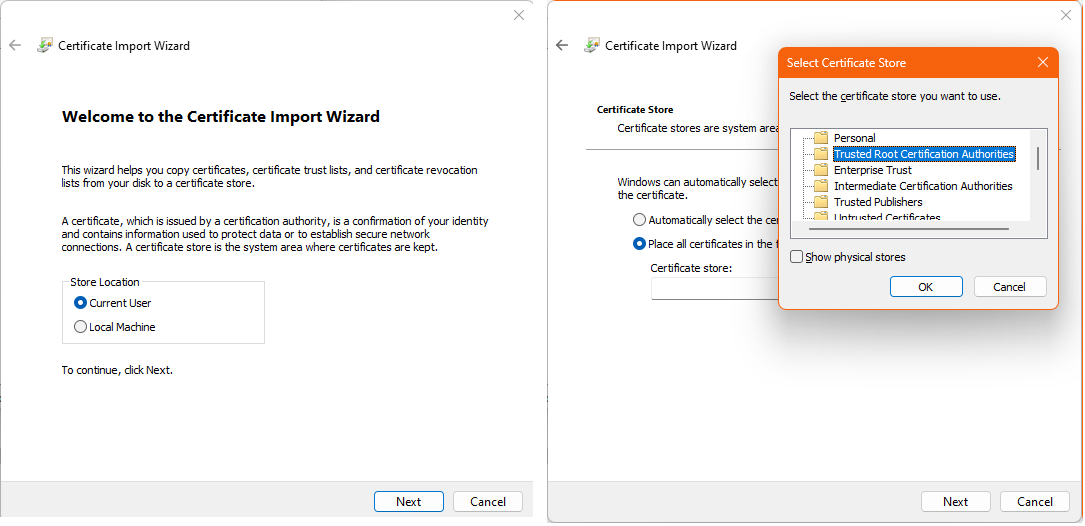
The Windows certificate (spfx-dev-cert.cer) is located in the root of the project in VS Code. Right click and choose download. Save the certificate in the Windows file system. I use the Downloads folder. Then you can open Windows explorer, navigate to the location of the certificate, right click and choose to Import Certificate. Follow the prompts, but choose to store the certificate in the Trusted Root Certificate Authorities store, as shown below.
You can run gulp serve now with no manifest error and proceed as normal.
Port forwarding
When you run your solution in any container, your browser needs to be able to communicate with your app on port 4321. Fortunately, Docker forwards that port to the host based on the devcontainer.json file we created earlier, so you do not need to do anything else for port forwarding.
Step 6. Run gulp serve and continue your development
Your container is properly configured now to run your SPFx project using the same process you always use to build SPFx solutions. The code is still located on your local device, so any changes made to the code will be saved locally.
So what did we accomplish?
At this point, it feels like we went through a lot of trouble just to run the code when we could have just run it after the initial project creation. That is true, but now this container is set up to be used anytime in the future. So when the next version of SPFx comes out and you change the tools on your local device, you can always just open the project in the container and all of the original tools are right where you left them. If you upgrade this project to a newer version of SPFx, you can just change the “image” property in the devcontainer.json file, rebuild the container, and install the new dev certificate.
To learn more about some of the issues I explained here, read the following article in the PnP Webpart Sample repository: Opening a sample using a development container
There is even more value to the work you did here when you save your project to GitHub and open it in Codespaces, but you’ll have to read the next article to get that goodness.
What’s next?
Next, we will look at how we can create a development environment without installing anything on our local device. We will use GitHub Codespaces to create containers that are fully configured and ready to use as soon as you start them, sometimes without leaving the browser!
As mentioned in the Disclaimer at the beginning of this article, I am not the final authority on this subject. If you find errors, PLEASE contact me at any of my Contact Me links. I want to make sure the information I am delivering is correct (and better understand it myself.)
References
- SharePoint Framework Quick Start: Covers the basics to get a development environment set up on a new machine.
- Better Node.js Install Management with Node Version Manager: Detailed article on NVM by Andrew Connell
- Node Version Manager(nvm)
- NVM for Windows
- Opening a sample using a development container
See ya soon!!!
{{ if (findRE “<pre” .Content 1) }} < script src = “/js/copy-code-button.js” > {{ end }}