Developer Certificate changes in SPFx v1.12.1
Recently, I had to set up a new development machine. These days, my primary development tasks are centered around SharePoint Framework (SPFx) solutions, so setting that up was my first goal. Everything was going smoothly until I tried to install the certificate that the development web server needs for developing SPFx solutions. From there, I descended down the certificate rabbit hole. After a couple of days of research and asking everyone I know for help, I was finally able to complete the task and decided that I better document it before I forget.
DISCLAIMER: While I have learned a lot about certificates while researching this issue, I don’t consider myself an expert on the subject. If you find errors in this post, PLEASE contact me so I can learn from you and fix the errors!
Side Note: Node Version Manager(nvm) is more helpful than ever
As I have stated in previous posts, I am a huge fan of nvm to easily switch between NodeJs environments. With the latest version of SPFx, v1.12.1, providing support for newer versions of NodeJs, v12 & v14, this is even more critical since there are thousands of sample solutions that cannot be run in a NodeJs v14.x environment without being upgraded. If you want to run those samples, or maybe just run some of your own previous solutions, you’ll need to use a supported version of NodeJs depending on the version of SPFx in the solution. (You can also upgrade the solution, but that can quickly become very complex.) There are a couple of reference blogs for figuring out which version is supported. While Hugo Bernier has maintained a great article with a compatibility matrix for a while, it looks like Microsoft Docs have also added a compatibility matrix (which looks suspiciously like Hugo’s until you notice that Hugo is one of the authors on the page!) Links to both pages can be found at the end of this post. If you are not using nvm to control NodeJs, now is the time to put this tool into your toolbox. Remember, there are two versions of the tool, depending on the host OS and there are a few CLI differences. Links to the Windows and non-Windows installation instructions are below.
Why do I need this certificate?
SPFx requires that the host that serves your SPFx code use the https protocol, which requires a certificate. When developing SPFx solutions, the SPFx project uses gulp tasks to start a NodeJs web server that hosts the code for the project. It also creates a local workbench which uses the certificate. If the certificate is not present, you will see the error in your browser about localhost not being trusted. Depending on your browser, you might be able to proceed anyway, but some browsers will not allow you to continue to the local workbench without the certificate. The following warning will appear when you execute “gulp serve”
Warning - [spfx-serve] When serving in HTTPS mode, a PFX cert path or a cert path and a
          key path must be provided, or a dev certificate must be generated and trusted.
          If a SSL certificate isn't provided, a default, self-signed certificate will
          be used. Expect browser security warnings.
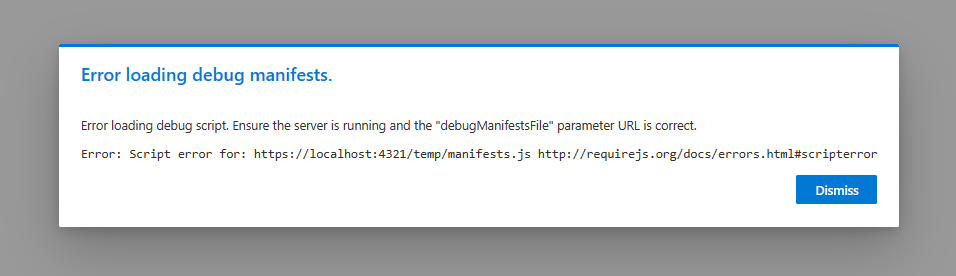
If you attempt to use the hosted workbench, the page will continually report that you need to run “gulp serve” in order to see your webpart in the toolbox even if you confirm “gulp serve” is running. This “error” is because of the untrusted nature of localhost, which the workbench is trying to contact. If you use the debug script query string in SharePoint (?debug=true&noredir=true&debugManifestsFile=https://localhost:4321/temp/manifests.js), you will get an “Error loading debug manifests” message. Again this is because localhost is not trusted without the certificate.
Certificate installation
Once you have the environment set with the correct versions of NodeJs, gulp, yo, and @microsoft/generator-sharepoint, you can create your first project and install the dependencies. The next step is to “trust” the developer certificate using the “gulp trust-dev-cert” command. This step only needs to be done once for each environment, which includes changes to the Host OS and NodeJs version. In Windows and MacOS, this command will generate the certificate and install it in your machine’s Certificate Store. However, if you are running this command from Linux, the command creates the certificate, but leaves the installation to you.
Learning and using Windows Subsystem for Linux (WSL)
While I always set up my Windows machines with the tools needed to do SPFx work, I started working with WSL about 18 months ago and find it is now my preferred environment. The first reason is performance. If you create or clone projects into the WSL file system, the speed of SPFx tasks like “npm install” are 3-4 times faster (unofficial observation) than when files are stored on the Windows file system. While that is reason enough for me, WSL gives me an opportunity to expand my developer knowledge into the Linux space. I am extremely interested in the Codespaces projects, first VS Codespaces and now GitHub Codespaces. Codespaces work by creating a cloud container running Linux and cloning a repository into the container. Working with these containers requires a basic understanding of Linux, so WSL has helped teach me how to make the most of the Codespaces tool.
Prior to SPFx v1.12.1, running “gulp trust-dev-cert” in WSL/Linux resulted in the following message on my laptop.
[trust-cert] Automatic certificate trust is only implemented for
             gulp-core-build-serve on Windows and macOS. To trust the development
             certificate, add this certificate to your trusted root certification
             authorities: "/home/donkirkham/.gcb-serve-data/gcb-serve.cer".
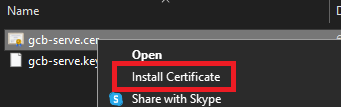
Navigating to the location “/home/donkirkham/.gcb-serve-data” permits me to install the certificate in the Windows Certificate Store and then proceed with development normally. (Pro Tip: For WSL, open Windows Explorer with the command “explorer.exe .”, then navigate to the “/home/donkirkham/.gcb-serve-data” folder and right click on gcb-serve.cer file to install. Be sure to install in the Trusted Root store)
With SPFx v1.12.1, a change was made on how the web server is created, so now I see the following message when I execute “gulp trust-dev-cert” in WSL.
[trust-cert] Automatic certificate trust is only implemented for debug-certificate-manager
             on Windows and macOS. To trust the development certificate, add this certificate
             to your trusted root certification authorities: "/home/donkirkham/_code/poll
             /node_modules/.pnpm/@rushstack+debug-certificate-manager@0.2.110/node_modules
             /@rushstack/debug-certificate-manager/temp/1625062121339.pem".
This is where my problems began. First, the SPFx team has changed how it builds the NodeJs web server, so the certificate process is changed too. No problem–I can roll with that. The problem is that is no certificate file (*.pem) is located at the address listed above! Several Teams, Twitter, and email conversations later, Andrew Connell found that the certificate is actually being copied from the temp location listed above to “home/donkirkham/.rushstack/rushstack-serve.pem”
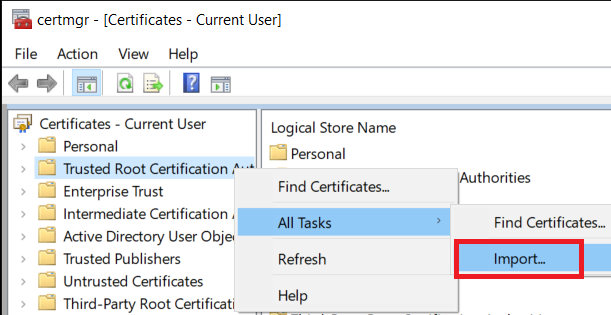
Problem solved–almost! The .pem extension is just a generic certificate extension, so it works (almost) the same the previous .cer extension. The one difference is that Windows does not have a file association with .pem, so there is not option to “Install Certificate” like before. The solution is to open the Certificate Manager and “Import” the certificate, as shown below.
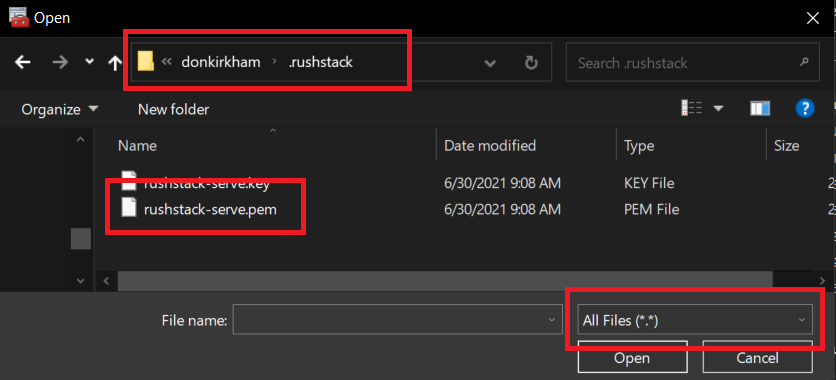
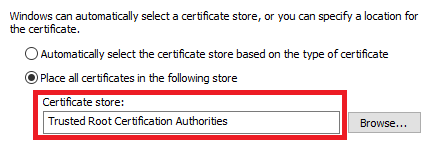
As shown in the second image, when you select the Certificate, you will need to navigate to the correct path and change the File Types to “All Files (*.*)” in order to select the rushstack-serve.pem file. Once installed, everything should return to normal.
Next Steps
Part of the work I have been doing with GitHub Codespaces involves creating files in the .devcontainer folder of your project that will configure a new Codespace with everything you need to execute “gulp serve” as soon as the container finished building so you can get right to work. Since the most common scenario when using Codespaces is to spin up a new Codespace to start working with a repo, the certificate needed will need to be trusted every time. If you reused the Codespace, you would not need to do this, but right now you are limited to 2 Codespaces at a time and when Codespaces hits General Availability, you will be paying (a little) for each Codespace. Previously, I included steps in a startup script to generate the certificate and copy it into my project to simplifying the download and install steps that must be performed manually. I will need to update that script with the new certificate steps listed above. Hopefully, I can add some logic to handle different scenarios based on the version of SPFx the project depends on.
If you made it this far, thanks for walking through this with me. Again, if I have mistakes in my explanations, PLEASE comment below or reach out to me at any of the links to the right. Thanks!
References
- Hugo Bernier’s compatibility matrix: https://tahoeninjas.blog/2019/12/30/spfx-compatibility-matrix/
- MSFT SPFx compatibility matrix: https://docs.microsoft.com/en-us/sharepoint/dev/spfx/compatibility
- Andrew Connell’s compatibility clarification: https://www.andrewconnell.com/blog/spfx-which-version-of-spfx-generator-to-install/
- Node Version Manager for Windows: https://github.com/coreybutler/nvm-windows
- Node Version Manager (non-Windows): https://github.com/nvm-sh/nvm